
Veranda Luxury Pontoon Boats
  • MODELS
    • V ONE
    • VERTEX SERIES
      • VERTEX PREMIUM RC
      • VERTEX PREMIUM DCRC
      • VERTEX PREMIUM VL
      • VERTEX PREMIUM DCVL
      • VERTEX PREMIUM TWIN
      • VERTEX RC
    • RELAX SERIES
      • RELAX RCP
      • RELAX RC
      • RELAX VL
      • RELAX VLI
      • RELAX L
      • RELAX FISH
      • RELAX RCP – CLASSIC
      • RELAX RC – CLASSIC
      • RELAX VLC – CLASSIC
    • VISTA SERIES
      • VISTA SPORT RC
      • VISTA VIEW RC
      • VISTA VIEW XRC
      • VISTA FISH
    • 2025 MODELS
    • TRAILERS
  • BUILD A BOAT
  • ABOUT US
    • WHY VERANDA
    • VERANDA DIFFERENCE
    • PERFORMANCE
    • CONSTRUCTION
    • MYTHS VS. FACTS
    • 2026 BOAT SHOWS
  • LOCATE A DEALER
  • REQUEST CATALOG
  • V.I.P.
  • OWNERS
    • OWNER’S MANUAL
    • FAQ
    • APPAREL
  • CAREERS
  • CONTACT
  • Menu Menu
Midship

Jensen Audio System (Vista View Series)
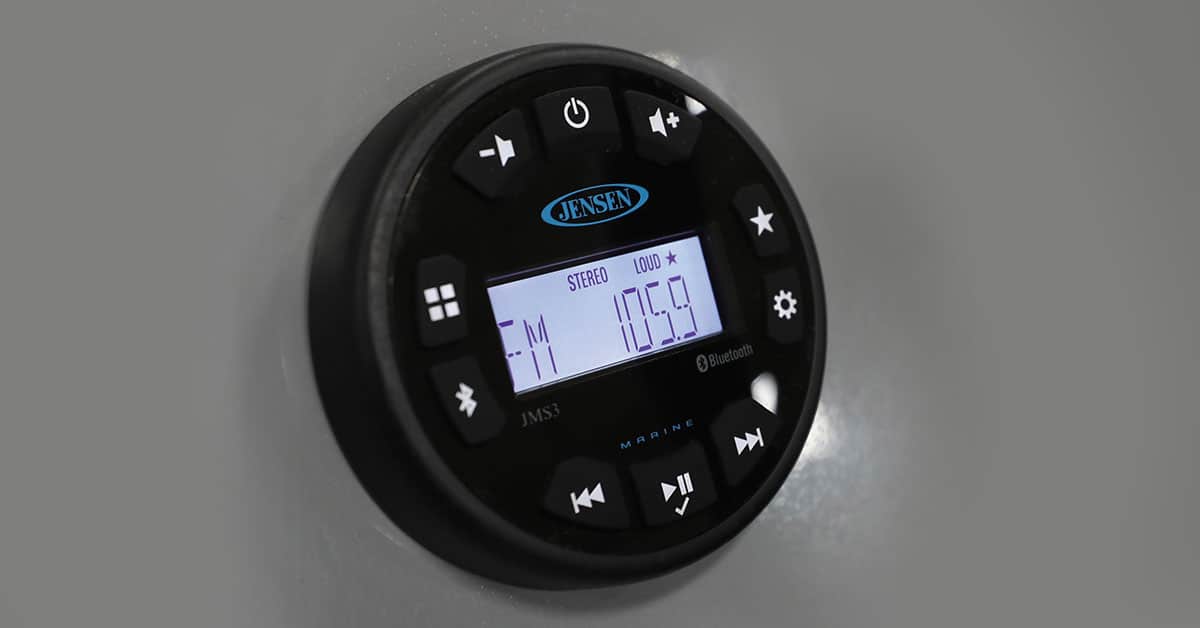
 

The JMS32 Jensen audio system comes standard on all older Veranda Luxury Pontoons Vista View Series. This page content will educate you on the interface and how to use it.

Located to the left of the steering wheel, this waterproof 160-watt stereo features 4-channel amplified audio output, Bluetooth streaming audio, a press-and-hold quick pairing Bluetooth button, a digital AM/FM tuner with 24 stations presets (12 FM, 12 AM), weather band tuner, daylight-readable LCD display and LED backlit buttons, Plus, the unit is corrosion and UV resistant.

Power Button 
The Power button is centered along the top of the receiver.
  • Press to turn the unit on.
  • Press and hold to enter standby mode.
Decrease Volume Button
The Decrease Volume button is located on the top left of the unit.
  • Press to decrease the volume level.
  • Press and hold to change the volume level continuously.
Increase Volume Button
The Increase Volume button is located to the right of the Power button.
  • Press to increase the volume level.
  • Press and hold to change the volume level continuously.
Playback/Preset Menu Button
The Playback/Preset Menu button is located after the Increase Volume button, in the upper right corner of the LCD display.
  • Press the button to select Repeat All, Repeat One, or Random Shuffle.
  • Press and hold to select available preset channels.
Menu Button
The Menu button is located just under the Playback button, in the lower right corner of the LCD display.
  • Press the button to access the audio menu.
  • Press the button repeatedly to adjust the following audio menu settings: Bass, Treble, Balance, Fader, and Loud. Use the previous and next buttons to choose a value for each setting.
  • Press and hold to access the system menu. Press the Menu button once again to adjust the following system menu settings: BT Device, BT Pair, Dimmer On/Off, Dimmer Level (0-8), Region (USA/EURO), Preset Volume and Reset. Use the previous and next buttons to choose a value for each setting.
Previous and Next Buttons
The Previous and Next Buttons are set along the bottom of the unit.
  • Press the previous or next button to fine-tune the radio frequency when in Radio mode.
  • Press and hold the previous or next button to seek strong radio frequencies.
  • Press the previous or next button to select the previous or next track when in Bluetooth Audio mode.
Play/Pause Button
The Play/Pause button is located at the bottom center of the unit.
  • Press to silence the audio output in tuner or Aux mode. Press again to restore the previous volume level.
  • Press to pause the Bluetooth audio playback. Press again to resume playback.
Bluetooth
Moving further around is the Bluetooth button located close to the 9 o’clock position on the unit.
  • Press and hold the Menu button to enter menu adjustment mode. The following additional menu options are available when the unit is in Bluetooth mode:
  • BT PAIR: on the BT PAIR  screen press the Play/Pause button to make pairing available for 120 seconds then connect using your Bluetooth-enabled device.
  • BT DEVICE: the BT DEVICE screen allows you to connect, disconnect, lock, unlock or delete a device.
  • To pair a device, first, you will need to make sure the device you intend to pair is on and ready to receive a signal from JMS32. Next, press the Bluetooth button on the unit to enter Bluetooth mode. Press and hold the Menu button and press repeatedly until the unit display PAIR, then press the Play/Pause button. The unit will display PAIR and count down from 120 to 0. Now search for available Bluetooth devices, select JMS32, and once connected the Bluetooth Audio icon will appear on the display. Enter pairing password 0000 if requested.
For additional information please reach out to your nearest authorized Veranda dealer, visit Jensen Electronics or click here to access the owner’s manual for the JMS32.

https://www.verandamarine.com/wp-content/uploads/2025/11/VerandaLogoForNav.png 0 0 Jon Vashey https://www.verandamarine.com/wp-content/uploads/2025/11/VerandaLogoForNav.png Jon Vashey2021-08-19 09:53:022026-07-15 08:26:27Jensen Audio System (Vista View Series)

Wiki Search

Table Of Contents

Your Veranda

  • Glossary of Terms
  • Pontoon Features
  • Aluminum Versus Wood
  • Veranda Walk-Around

Starboard

  • Panels & Rails
  • Serial Number

Forward

  • Quick Release Bumper Hardware
  • Seating & Upholstery
  • Flooring
  • Center Toon In-Floor Storage

Midship

  • VP Helm
  • Vertex Helm
  • V One Overview
  • Relax/Fish Deluxe & Luxury Helm
  • Vista View Helm
  • Power Assist Hydraulic Steering
  • Infinity Audio System (VP & Vertex Series)
  • JL Audio System (VP & Vertex Series)
  • Clarion Audio System (Relax, Fish & Vista View Series)
  • Kicker Audio System (Relax & Fish Series)
  • Jensen Audio System (Vista View Series)
  • Simrad GO7 and GO5 Chart Plotter
  • In-Dash RGB Lighting Controller
  • RGB Lighting Controller (Older Style, Above the Throttle)
  • Shadow-Caster In-Dash Lighting Controller (VP & Vertex Series)
  • Shadow-Caster Lighting Controller (2021 Relax & Fish Series Luxury Package)
  • Shadow-Caster Lighting Controller (2021 Relax & Fish Series Deluxe Package)
  • Manual Bimini
  • Double Manual Bimini
  • Vista View Manual Bimini
  • Powered Bimini
  • VP Arch Wakeboard Tower With Bimini
  • Adjusting Your Chair
  • Privacy Room

Aft

  • Rear Facing Lounges & Rear Chaises
  • Versa Lounge
  • Removable Table
  • Dual Battery Harness With Switch
  • Fish Station (Fish Series Only)

Operating Your Veranda

  • Pre-Departure Safety Checklist
  • Fueling
  • Boarding & Weight Distribution
  • Navigating

Trailering

  • BackTrack Trailers, Towing Vehicle & Hitching a Boat

Care & Maintenance

  • Ratchet Cover
  • Vista View Clip Cover
  • Pre-Season Boat Maintenance
  • Post-Season Boat Maintenance
Veranda Luxury Pontoons logo
Veranda Luxury Pontoons
1392 Remmel Dam Rd.
Malvern, AR 72104
Ph. 501-844-4651

Powered by
Yamaha logo

Menu

  • About Us
  • Locate a Dealer
  • V.I.P.
  • Apparel
  • Careers
  • Dealer Login
  • 2026 Boat Shows
  • Contact Us

Models

  • V One
  • Vertex Series
  • Relax Series
  • Vista Series
© Copyright Veranda Marine | Privacy Policy | Site by Valeo Online Marketing.
  • Link to Facebook
  • Link to Youtube
  • Link to Instagram
  • Link to TikTok
  • Link to LinkedIn
Scroll to top Scroll to top Scroll to top
× Popup Image
Manage Consent
To provide the best experiences, we use technologies like cookies to store and/or access device information. Consenting to these technologies will allow us to process data such as browsing behavior or unique IDs on this site. Not consenting or withdrawing consent, may adversely affect certain features and functions.
Functional Always active
The technical storage or access is strictly necessary for the legitimate purpose of enabling the use of a specific service explicitly requested by the subscriber or user, or for the sole purpose of carrying out the transmission of a communication over an electronic communications network.
Preferences
The technical storage or access is necessary for the legitimate purpose of storing preferences that are not requested by the subscriber or user.
Statistics
The technical storage or access that is used exclusively for statistical purposes. The technical storage or access that is used exclusively for anonymous statistical purposes. Without a subpoena, voluntary compliance on the part of your Internet Service Provider, or additional records from a third party, information stored or retrieved for this purpose alone cannot usually be used to identify you.
Marketing
The technical storage or access is required to create user profiles to send advertising, or to track the user on a website or across several websites for similar marketing purposes.
  • Manage options
  • Manage services
  • Manage {vendor_count} vendors
  • Read more about these purposes
View preferences
  • {title}
  • {title}
  • {title}