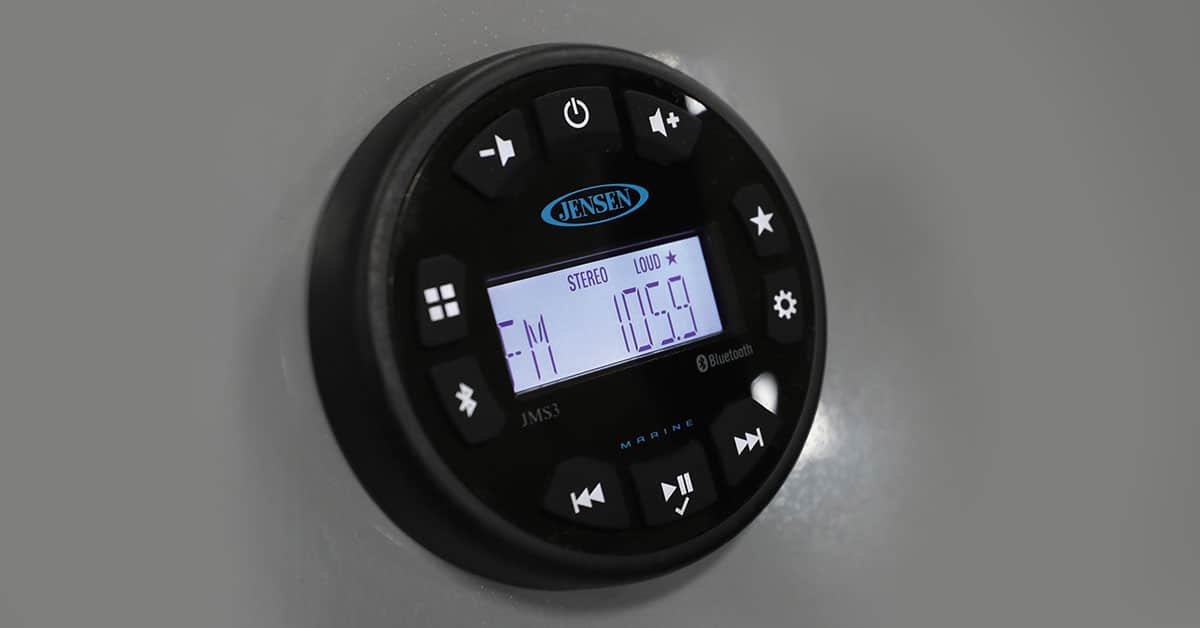
The JMS32 Jensen audio system comes standard on all older Veranda Luxury Pontoons Vista View Series. This page content will educate you on the interface and how to use it.

Located to the left of the steering wheel, this waterproof 160-watt stereo features 4-channel amplified audio output, Bluetooth streaming audio, a press-and-hold quick pairing Bluetooth button, a digital AM/FM tuner with 24 stations presets (12 FM, 12 AM), weather band tuner, daylight-readable LCD display and LED backlit buttons, Plus, the unit is corrosion and UV resistant.

Power Button 
The Power button is centered along the top of the receiver.
  • Press to turn the unit on.
  • Press and hold to enter standby mode.
Decrease Volume Button
The Decrease Volume button is located on the top left of the unit.
  • Press to decrease the volume level.
  • Press and hold to change the volume level continuously.
Increase Volume Button
The Increase Volume button is located to the right of the Power button.
  • Press to increase the volume level.
  • Press and hold to change the volume level continuously.
Playback/Preset Menu Button
The Playback/Preset Menu button is located after the Increase Volume button, in the upper right corner of the LCD display.
  • Press the button to select Repeat All, Repeat One, or Random Shuffle.
  • Press and hold to select available preset channels.
Menu Button
The Menu button is located just under the Playback button, in the lower right corner of the LCD display.
  • Press the button to access the audio menu.
  • Press the button repeatedly to adjust the following audio menu settings: Bass, Treble, Balance, Fader, and Loud. Use the previous and next buttons to choose a value for each setting.
  • Press and hold to access the system menu. Press the Menu button once again to adjust the following system menu settings: BT Device, BT Pair, Dimmer On/Off, Dimmer Level (0-8), Region (USA/EURO), Preset Volume and Reset. Use the previous and next buttons to choose a value for each setting.
Previous and Next Buttons
The Previous and Next Buttons are set along the bottom of the unit.
  • Press the previous or next button to fine-tune the radio frequency when in Radio mode.
  • Press and hold the previous or next button to seek strong radio frequencies.
  • Press the previous or next button to select the previous or next track when in Bluetooth Audio mode.
Play/Pause Button
The Play/Pause button is located at the bottom center of the unit.
  • Press to silence the audio output in tuner or Aux mode. Press again to restore the previous volume level.
  • Press to pause the Bluetooth audio playback. Press again to resume playback.
Bluetooth
Moving further around is the Bluetooth button located close to the 9 o’clock position on the unit.
  • Press and hold the Menu button to enter menu adjustment mode. The following additional menu options are available when the unit is in Bluetooth mode:
  • BT PAIR: on the BT PAIR  screen press the Play/Pause button to make pairing available for 120 seconds then connect using your Bluetooth-enabled device.
  • BT DEVICE: the BT DEVICE screen allows you to connect, disconnect, lock, unlock or delete a device.
  • To pair a device, first, you will need to make sure the device you intend to pair is on and ready to receive a signal from JMS32. Next, press the Bluetooth button on the unit to enter Bluetooth mode. Press and hold the Menu button and press repeatedly until the unit display PAIR, then press the Play/Pause button. The unit will display PAIR and count down from 120 to 0. Now search for available Bluetooth devices, select JMS32, and once connected the Bluetooth Audio icon will appear on the display. Enter pairing password 0000 if requested.
For additional information please reach out to your nearest authorized Veranda dealer, visit Jensen Electronics or click here to access the owner’s manual for the JMS32.

It’s inevitable that at some point while you are out on the water someone will need some privacy to use the restroom or change clothes, both of which can quickly lower the fun factor if you have to run back to the ramp or find a marina. The privacy room, included on all Veranda Luxury Pontoons is the solution to remaining out on the lake. 

Available on all VP, Vertex, Relax, and most Fish Series, this standard feature is deployed by lifting up on the handle located along the floor near the port entry gate. Once the panel opens up vertically, you need to pull the black strap downward to release the top support bar, which will fold out towards you until it’s horizontal. Now all you have to do is fold out the canvas material for use. The flap can be snapped closed by the user inside. 

A portable camp toilet could be purchased from most major marine suppliers. 

For additional information please reach out to your nearest authorized Veranda dealer or visit www.verandamarine.com.

Practice makes perfect and like other features on your Veranda, allowing adequate time to learn how to operate each component on your new boat will ensure you are able to reap the most benefits out of your investment and previous time on the water. Whether running across the lake or soaking up some sunshine on a secluded cove, you will inevitably spend a lot of time sitting in the captain’s chair. The features and styles may vary slightly depending upon the Veranda Luxury Pontoons series and package you purchased.

The High Rise Hydraulic Helm Chair comes standard on all VP and Vertex Series, along with the Luxury Package on all Relax and Fish Series. 

The Reclining Helm Chair comes standard on all Deluxe and Base Packages on all Relax and Fish Series, along with the Vista View Series. A hydraulic pedestal is the only difference between the two. 

Knowing what each lever does allows you to make necessary adjustments before you get underway to ensure proper positioning and maximum comfort. The port side lever, located underneath the front of the seat base, adjusts the hydraulic pedestal base, moving you up or down. Sit on the chair, slightly lift your body up and pull the lever to raise it up higher, or remain seated and pull the lever to lower the seat down closer to the deck. 

Dropping the middle handle, located underneath the front of the seat base, unlocks the seat and allows you to rotate the chair around. Lifting the handle back up will lock it in place. 

The starboard side lever, located underneath the front of the seat base, allows you to move the chair forward or backward from the console. 

Unscrewing the round knob, located directly on the top of the seat base, unlocks the chair from the base, allowing you to remove it from the deck.

Finally, pulling up on the handle located in the middle of the seat base cushion allows you to adjust the angle of the seatback. 

Having a solid understanding of these various components of the seat will instantly reap rewards both on your ability to safely operate the pontoon and enjoy leisure time. 

For additional information please reach out to your nearest authorized Veranda dealer or visit www.verandamarine.com.

The VP Rear Chaise Tower is the perfect fusion of water sports excitement, sport luxury style, and pillow-top comfort. This video segment will educate you about how to properly set up the bimini on your wakeboard tower for a fun-filled day on the water. 

You must always have a bimini anchor light on when operating in low-light conditions. You will need to locate the bimini anchor light that attaches to the top of the wakeboard tower, standing on one of the helm seats flip the cap on top of the light base open, insert the light pole and twist the base to lock in place. 

The bimini that extends outward from the folding arch wakeboard tower requires some practice and patience to learn how to properly deploy and store. We suggest you learn how to do this on land before you head out on the water for the first time.

The bimini frame is secured to the wakeboard tower with two straps. You can set the frame into radar position by removing both straps and freeing the secured frame piping arm on each side by removing it from the bracket, so it is loose and hangs down. Next, grasp the pole with both hands, and with one hand press and hold the release button and gently extend the pole with both hands until it’s fully extended. 

Now turn the safety pin on the base of the stainless still socket lower down on the wakeboard tower. 

Repeat this same process step by step on the other side. Now grasp the center of the bimini and extend the frame outward toward the stern. While still holding the frame with one hand, use your other hand to secure the ball end of the hanging frame arm into the socket on the tower, once in place, turn the safety pin to lock it into the hardware. Repeat this on the other side. You may need to adjust the extension arm on both sides by pushing the release button and changing the length of the pole until the frame is fully supported and not loose or flopping around.

If you wish to fully deploy the bimini on your VP Rear Chaise Tower you need to locate the removable pieces of bimini poles that attach to the bow side of the folding wakeboard tower. They should be inside the center toon in-floor storage or underneath a seat. The extra bimini pieces need to be inserted into the holes located toward the top of the forward side of the folding arch wakeboard tower. 

Next, unzip, remove and stow the bimini cover. Next, unfold the canvas and stretch it over the top of the wakeboard tower, being sure that the bimini anchor light extends through the hole in the canvas. Continue to move the canvas toward the bow and pull it over the frame until it is seated securely. Now, move to the aft side of the tower and adjust the extension poles until the bimini canvas is firmly secure and not flopping around. 

Please note that the canvas on a new pontoon will still be tight, so you may need to pull downward on the frame to get the hinge to lock into the base. After the canvas has had time to stretch it will be easier to deploy.

Getting a second person to help with the deployment of the folding arch wakeboard tower with bimini will make for a much easier and enjoyable process.

WARNING:
Please be aware that on windy days you can damage the bimini frame, pontoon rails, and even injure passengers when attempting to deploy the bimini. It’s also not recommended that you run the pontoon at high speeds with the bimini deployed as it will put unnecessary stress on the frame which will bend and damage it over time.

When trailering, be sure to lock the two zippers together in the center of the cover with the clip to ensure it does not blow off when traveling and damage your bimini canvas or frame.  

For additional information please reach out to your nearest authorized Veranda dealer or visit www.verandamarine.com.

Your Veranda Luxury Pontoons powered bimini allows you and your passengers to enjoy longer days on the water by providing necessary shade from the sun or light rain. The standard size for the powered bimini is 9 feet, but you may have opted for the 11-foot upgrade to provide extra coverage from the elements. 

Standard Size: 9’

Options Upgrade Size: 11’

The first thing most boat owners do when they get onto their pontoon is to raise the bimini up from the flat storage position to 45 degrees, or radar position as we like to call it, which allows you and your passengers to access the aft and stern swim deck. Be sure to raise the bimini anchor light to an upright position if you are operating your pontoon in low-light conditions. 

The switch to operate the powered bimini on all VP and Vertex Series is located on the right side of the dash. Press and hold the button until it’s in the 45-degree radar position. If you wish to fully deploy the powered bimini, you will want to lower it back down to storage position, unzip and remove the cover, then press the “Up” again until it is completely deployed overhead.

WARNING:
Please be aware that on windy days you can damage the bimini frame, pontoon rails and even injure passengers when attempting to deploy the bimini. It’s also not recommended that you run the pontoon at high speeds with the bimini deployed as it will put unnecessary stress on the frame which will bend and damage it over time. 

When trailering, be sure to lock the two zippers together in the center of the cover with the clip to ensure it does not blow off when traveling and damage your bimini canvas or frame.  

For additional information please reach out to your nearest authorized Veranda dealer or for questions about the powered bimini go to www.ameritexdirect.com.

Your Veranda Luxury Pontoons Vista View manual bimini allows you and your passengers to enjoy longer days on the water by providing the necessary shade from the sun or light rain. The Vista View manual bimini comes in a 9-foot length and is standard.

Standard Size: 9’

The first thing most boat owners do when they get onto their pontoon is to raise the bimini up from the flat storage position to 45 degrees, or radar position as we like to call it, which allows you and your passengers to access the aft and stern swim deck. Be sure to raise the bimini anchor light to an upright position if you are operating your pontoon in low-light conditions. 

To move the bimini up to the radar position, you will need to access the quick release hardware on the top of both the port and starboard fences and remove the safety pin to unlock the bimini frame. If it won’t release easily, you can grab the bimini frame with one hand while removing the pin with the other. Once both sides of the frame are disconnected from the top of the rail, you will need to firmly grab the side of the bimini frame and raise it upwards to 45 degrees. Now grab the longer frame arm and remove it from the bracket holding it in place to allow it to hang down vertically. Next, with your free hand grab the base of the hanging arm and move the ball into the base of the quick-release hardware. Once firmly seated in the base, you will want to push the safety pin back in to secure the frame arm in the base. Now move to the other end of the frame, still holding the bimini, and repeat the same steps to get that end of the frame arm secured into the base.

To open up your bimini fully you will need to unzip and remove the cover. Remove the safety pin from both of the quick-release bumper hardware bases. Now reach up and firmly grab the top, horizontal frame of the bimini and walk forward towards the bow to open up the bimini canvas. Once it’s fully extended you will need to move to either end of the frame along the fence and with one hand continue to hold the bimini up and with the other hand, grab the arm that is secured to the main frame, remove it from the bracket so it hangs down vertically and secures the ball of it into the base of the quick release until it locks into place.  Once firmly seated in the base, you will want to push the safety pin back in to secure the frame arm in the base. Now move to the other end of the frame, still holding the bimini up, and repeat the same steps to get that end of the frame arm secured into the base.

Please note that the canvas on a new pontoon will still be tight, so you may need to pull downward on the frame to get the hinge to lock into the base. After the canvas has had time to stretch it will be easier to deploy.

Getting a second person to help with the deployment of the Vista View manual bimini will make for a much easier and enjoyable process. 

WARNING:
Please be aware that on windy days you can damage the bimini frame, pontoon rails, and even injure passengers when attempting to deploy the bimini. It’s also not recommended that you run the pontoon at high speeds with the bimini deployed as it will put unnecessary stress on the frame which will bend and damage it over time. 

When trailering, be sure to lock the two zippers together in the center of the cover with the clip to ensure it does not blow off when traveling and damage your bimini canvas or frame.  

For additional information please reach out to your nearest authorized Veranda dealer or visit www.verandamarine.com.

Your Veranda Luxury Pontoons double manual bimini allows you and your passengers to enjoy longer days on the water by providing additional shade from the sun or light rain over the entire interior. The standard size for the double-manual bimini is 9 feet, but you may have opted for the 11-foot upgrade to provide extra coverage from the elements. The double-manual bimini is an optional upgrade on Relax and Fish Series. The first thing most boat owners do when they get onto their pontoon is to raise the bimini from the stowed position to 45 degrees, or radar position as we like to call it, which allows you and your passengers to access the aft and stern swim deck. Be sure to raise the bimini anchor light in the aft to an upright position if you are operating your pontoon in low-light conditions.

Standard Size: 9’

Options Upgrade Size: 11’

To move the bimini up to the radar position, you will need to access the quick release hardware on the top of both the port and starboard fences, grab the bimini frame with one hand while pressing the release button with the other. Repeat on the other side. Once disconnected from the top of the rail, you will need to firmly grab the center of the bimini frame and raise it upwards to about 45 degrees. Next, move to either end of the frame along the fence and with one hand continue to hold the bimini up and with the other grab the longer arm that is secured to the frame and release it from the plastic clip, so it hangs downward. You then need to place the hinge into the base of the quick release until it locks into place. Now move to the other end of the frame, still holding the bimini up with your arm, and repeat the same steps to get that end of the frame arm secured into the base. Repeat with this same process with the second bimini on your pontoon.

To fully deploy the bimini you will need to unzip the cover and remove it. Now reach up and firmly grab the top, horizontal frame of the bimini and walk it out to open up the bimini canvas. Once it’s fully extended you will need to move to either end of the frame along the fence and with one hand continue to hold the bimini up and with the other hand grab the additional frame arm, release it from the bracket so that it hangs down and secure the hinge into the base of the quick release until it locks into place. Repeat with the other end of the frame. Next, repeat the entire process with the second bimini on your pontoon. The last step involves you joining both bimini canvases together with the zipper, which will provide a single covering over the entire interior. 

Please note that the canvas on a new pontoon will still be tight, so you may need to pull downward on the frame to get the hinge to lock into the base. After the canvas has had time to stretch it will be easier to deploy.

Getting a second person to help with the deployment of the double-manual bimini will make for a much easier and more enjoyable process. 

WARNING:

Please be aware that on windy days you can damage the bimini frame, pontoon rails, and even injure passengers when attempting to deploy the bimini. It’s also not recommended that you run the pontoon at high speeds with the bimini deployed as it will put unnecessary stress on the frame which will bend and damage it over time. 

When trailering, be sure to lock the two zippers together in the center of the cover with the clip to ensure it does not blow off when traveling and damage your bimini canvas or frame.  

For additional information please reach out to your nearest authorized Veranda dealer, for questions regarding the standard 9’ bimini and forward bimini visit www.tumacscovers.com, or for questions about the optional 11’ bimini upgrade go to www.ameritexdirect.com.

Your Veranda Luxury Pontoons manual bimini allows you and your passengers to enjoy longer days on the water by providing the necessary shade from the sun or light rain. The standard size for the manual bimini is 9 feet, but you may have opted for the 11-foot upgrade to provide extra coverage. 

Standard Size: 9’

Options Upgrade Size: 11’

The manual bimini comes standard on Relax, Fish Series. The first thing most boat owners do when they get onto their pontoon is to raise the bimini from the stowed position to 45 degrees, or radar position as we like to call it, which allows you and your passengers to access the aft and stern swim deck. 

Be sure to raise the bimini anchor light to an upright position if you are operating your pontoon in low-light conditions. 

To move the bimini up to the radar position, you will need to access the quick release hardware on the top of both the port and starboard fences, grab the bimini frame with one hand while pressing the release button with the other. Repeat on the other side. Once disconnected from the top of the rail, you will need to firmly grab the center of the bimini frame and raise it upwards to about 45 degrees. Next, move to either end of the frame along the fence and with one hand continue to hold the bimini up and with the other grab the longer arm that is secured to the frame and release it from the plastic clip, so it hangs downward. You then need to place the hinge into the base of the quick release until it locks into place. Now move to the other end of the frame, still holding the bimini up with your arm, and repeat the same steps to get that end of the frame arm secured into the base.

To fully deploy the bimini you will need to unzip the cover and remove it. Now reach up and firmly grab the top, horizontal frame of the bimini and walk it out to open up the bimini canvas. Once it’s fully extended you will need to move to either end of the frame along the fence and with one hand continue to hold the bimini up and with the other hand grab the additional frame arm, release it from the bracket so that it hangs down and secure the hinge into the base of the quick release until it locks into place. Repeat with the other end of the frame. 

Please note that the canvas on a new pontoon will still be tight, so you may need to pull downward on the frame to get the hinge to lock into the base. After the canvas has had time to stretch it will be easier to deploy. 

A second person to help with the deployment of the manual bimini will make for a much easier and enjoyable process.

WARNING:
Please be aware that on windy days you can damage the bimini frame, pontoon rails, and even injure passengers when attempting to deploy the bimini. It’s also not recommended that you run the pontoon at high speeds with the bimini deployed as it will put unnecessary stress on the frame which will bend and damage it over time. 

When trailering, be sure to lock the two zippers together in the center of the cover with the clip to ensure it does not blow off when traveling and damage your bimini canvas or frame. 

For additional information please reach out to your nearest authorized Veranda dealer, for questions regarding the standard 9’ bimini visit www.tumacscovers.com, or for questions about the optional 11’ bimini upgrade go to www.ameritexdirect.com.

The Shadow-Caster multi-zone lighting controller comes standard on the 2021 Relax and Fish Series with the luxury package. This feature provides easy lighting control functionality including RGBW, zone control, multiple fade mode changes, brightness in each zone, and music sync. The RGB LTS toggle switch is located on the right side of the dash. 

  • ON – Press RGB LTS to power on the RGB lights. The lights will slowly ramp up to full bright white.
  • COLOR SCROLL – A quick press and release on the RGB LTS will start color scroll. A subsequent quick press and release will stop on the current color.
  • BRIGHTNESS CONTROL – Press and hold RGB LTS and the lights will step down in brightness. Release the button when the desired brightness is achieved. Press and hold again to increase brightness.
  • INCREMENTAL COLOR STEP – Clicking RGB LTS repeatedly will step between discrete colors.
  • OFF – Press RGB LTS to power on the RGB lights.

Please note that by law, you are required to display appropriate navigational lights at night or during times of reduced visibility. No other lights can be displayed at this time, nor any that impair the visibility or distinctive character of navigation lights, or interfere with the keeping of a proper lookout. Please check with your local authority on whether or not your underdeck or underwater lighting can be used at these times. Refer to the separate video on navigational lights for more information. 

For additional information please reach out to your nearest authorized Veranda dealer or visit www.shadow-caster.com.

Veranda’s goal is to provide you with the best possible value for your investment, which ensures a lifetime of enjoyment for you. This requires constant research and testing of components, including the RGB Lighting Controller with touch screen technology, found on most 2019 and 2020 model year Veranda Relax and Fish Series. This panel is located in front of the throttle and is used to control the interior, underdeck, and underwater lighting. 

Please note that by law, you are required to display appropriate navigational lights at night or during times of reduced visibility. No other lights can be displayed at this time, nor any that impair the visibility or distinctive character of navigation lights, or interfere with the keeping of a proper lookout. Please check with your local authority on whether or not your underdeck or underwater lighting can be used at these times. 

Refer to the separate video on navigational lights for more information. 

Power Button
The power button, located directly in the center, is used to power on/off the lights. Press the power button directly in the center to turn the unit on and off.

RGB Color Ring
Surrounding the power button is the RGB color ring, which controls the hue displayed on the LED lights. To change it, just touch and slide your finger to the color that you want to be displayed. 

Dimmer Up & Down Buttons
The dimmer up and dimmer down will change the brightness of the lighting. 

Four Mode Buttons
The four mode buttons along the top of the panel are used to adjust how the light is displayed. Slow fade will change out the colors slowly from one to the next. Fast fade will change them out at a faster pace. Slow strobe will flash the color slowly while fast strobe will make them flash at a faster rate. 

Four Color Buttons
The four, color buttons along the bottom of the panel are used to adjust the color of the light. You can select between red, green, and blue. The system does not include white LEDs, so this button has no function. 

For additional information please reach out to your nearest authorized Veranda dealer or visit www.verandamarine.com.